어제 밤 주목할 만한 소식이 있습니다.
OpenAI에서 GPT-4o가 출시되었으며, 크게 4개의 특징이 있습니다.
OpenAI GPT-4o 특징
- 비디오 대화 가능 추가(화면을 공유하고 대화하며 수학문제를 푸는 것도 가능-https://vimeo.com/945587328)
- 화상으로 대화가 가능
- 비디오를 입력으로 넣으면 Visual Summary, Audio Summary, Visual + Audio Summary 가능
- GPT-4-Turbo보다 2배 빠른 속도로 생성 가능
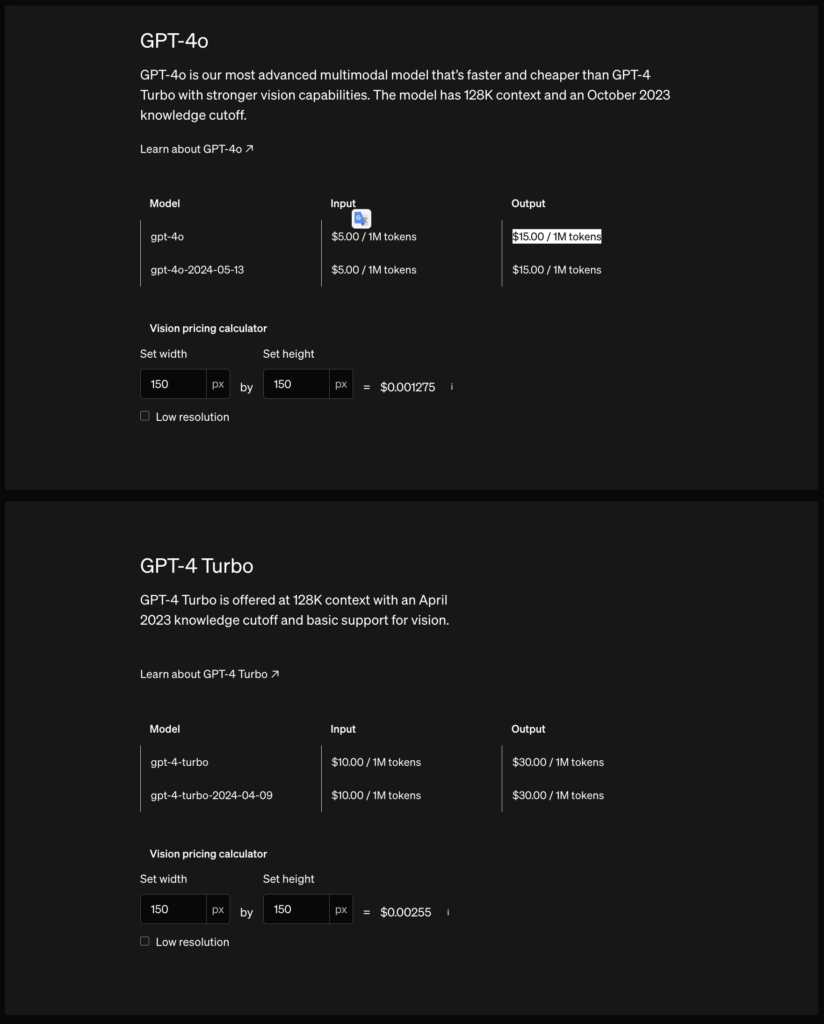
- GPT-4-Turbo보다 2배 저렴한 API 가격
- GPT-4o
- input : $5.00 / 1M tokens
- output : $15.00 / 1M tokens
- GPT-4 Turbo
- input : $10.00 / 1M tokens
- output : $30.00 / 1M tokens
- GPT-4o
- 토크나이저 효율화 : 이번 업데이트에서 한국어 처리의 토큰 효율이 기존 대비 1.7배 개선되었어요. OpenAI의 토큰 단위 과금 정책을 고려할 때, 이러한 효율성 향상은 데이터 처리량을 줄이면서 동일한 작업을 수행할 수 있게 하므로, 사용 비용을 절감 할 수 있을거 같아요.

참고링크
- 이곳에서 다양한 테스트를 해볼 수 있어요 :
https://platform.openai.com/playground/chat?mode=chat&model=gpt-4o&models=gpt-4o - 샘 알트만이 GPT-4o를 발표하며 썼던 블로그에요 :
https://blog.samaltman.com/gpt-4o - 공식 홈페이지에서 GPT-4o를 어떻게 소개하는지 궁금하다면 이곳을 참고해주세요 :
https://openai.com/index/hello-gpt-4o/
사용방법
Text Generation
from openai import OpenAI
import os

## Set the API key and model name
MODEL="gpt-4o"
client = OpenAI(api_key=os.environ.get("OPENAI_API_KEY", "<your OpenAI API key if not set as an env var>"))
completion = client.chat.completions.create(
model=MODEL,
messages=[
{"role": "system", "content": "You are a helpful assistant. Help me with my math homework!"}, # <-- This is the system message that provides context to the model
{"role": "user", "content": "Hello! Could you solve 2+2?"} # <-- This is the user message for which the model will generate a response
]
)
print("Assistant: " + completion.choices[0].message.content)Image Processing(Local PC)
from IPython.display import Image, display, Audio, Markdown
import base64

IMAGE_PATH = "당신이 가지고 있는 로컬PC 이미지경로"

# Preview image for context
display(Image(IMAGE_PATH))

# Open the image file and encode it as a base64 string
def encode_image(image_path):
    with open(image_path, "rb") as image_file:
        return base64.b64encode(image_file.read()).decode("utf-8")

base64_image = encode_image(IMAGE_PATH)

response = client.chat.completions.create(
    model=MODEL,
    messages=[
        {"role": "system", "content": "You are a helpful assistant that responds in Markdown. Help me with my math homework!"},
        {"role": "user", "content": [
            {"type": "text", "text": "이미지를 보고 질문하고 싶은 내용은?"},
            {"type": "image_url", "image_url": {
                "url": f"data:image/png;base64,{base64_image}"}
            }
        ]}
    ],
    temperature=0.0,
)

print(response.choices[0].message.content)
- Base64를 사용하는 이유
위 과정대로 Base64로 인코딩을 하게 되면 6bits당 2bits의 overhead가 발생하여 전송해야 될 데이터의 크기가 약 33% 정도 증가합니다. 또한, 인코딩과 디코딩의 추가 연산까지 필요합니다. 이럼에도 불구하고 Base64를 쓸 수 밖에 없는 이유는 통신과정에서 바이너리 데이터의 손실을 막기 위해 사용합니다. Binary Data(이미지 또는 오디오)를 전송할 때 ASCII로 encoding하여 전송하게 되면 여러 가지 문제가 발생됩니다. 첫째, ASCII는 7bits encoding인데 나머지 1bit를 처리하는 방식이 시스템 별로 상이합니다. 둘째, Line ending 등의 제어 문자의 경우 시스템 별로 다른 코드값을 가집니다. 이에, ASCII은 시스템 간 데이터를 전달하기에 안전하지 않습니다. - 그럼 base64는 어떻게 데이터를 안전하게 전송하는가?
만약 입력된 바이트가 하나라면 출력 중 두 개만이 사용되고 나머지 둘은"="으로 패딩되며, 입력된 바이트가 둘이라면 출력 중 세 개 만이 사용되고 나머지 하나는"="으로 패딩되게 된다. 이것은 원본으로 되돌릴 때 원본에는 없던 비트가 생기는 것을 방지하기 위함이다. 이 과정을 입력 데이터가 끝날 때까지 반복하면 인코딩이 된다.
Image Processing(URL)
response = client.chat.completions.create(
    model=MODEL,
    messages=[
        {"role": "system", "content": "You are a helpful assistant that responds in Markdown. Help me with my math homework!"},
        {"role": "user", "content": [
            {"type": "text", "text": "What's the area of the triangle?"},
            {"type": "image_url", "image_url": {
                "url": "https://upload.wikimedia.org/wikipedia/commons/e/e2/The_Algebra_of_Mohammed_Ben_Musa_-_page_82b.png"}
            }
        ]}
    ],
    temperature=0.0,
)

print(response.choices[0].message.content)
Video Processing
Setup for Video Processing
%pip install opencv-python --quiet
%pip install moviepy --quiet
import cv2
from moviepy.editor import VideoFileClip
import time
import base64
# We'll be using the OpenAI DevDay Keynote Recap video. You can review the video here: https://www.youtube.com/watch?v=h02ti0Bl6zk
VIDEO_PATH = "data/keynote_recap.mp4"def process_video(video_path, seconds_per_frame=2):
base64Frames = []
base_video_path, _ = os.path.splitext(video_path)
video = cv2.VideoCapture(video_path)
total_frames = int(video.get(cv2.CAP_PROP_FRAME_COUNT))
fps = video.get(cv2.CAP_PROP_FPS)
frames_to_skip = int(fps * seconds_per_frame)
curr_frame=0
# Loop through the video and extract frames at specified sampling rate
while curr_frame < total_frames - 1:
video.set(cv2.CAP_PROP_POS_FRAMES, curr_frame)
success, frame = video.read()
if not success:
break
_, buffer = cv2.imencode(".jpg", frame)
base64Frames.append(base64.b64encode(buffer).decode("utf-8"))
curr_frame += frames_to_skip
video.release()
# Extract audio from video
audio_path = f"{base_video_path}.mp3"
clip = VideoFileClip(video_path)
clip.audio.write_audiofile(audio_path, bitrate="32k")
clip.audio.close()
clip.close()
print(f"Extracted {len(base64Frames)} frames")
print(f"Extracted audio to {audio_path}")
return base64Frames, audio_path
# Extract 1 frame per second. You can adjust the `seconds_per_frame` parameter to change the sampling rate
base64Frames, audio_path = process_video(VIDEO_PATH, seconds_per_frame=1)
response = client.chat.completions.create(
    model=MODEL,
    messages=[
    {"role": "system", "content": "You are generating a video summary. Please provide a summary of the video. Respond in Markdown."},
    {"role": "user", "content": [
        "These are the frames from the video.",
        *map(lambda x: {"type": "image_url",
                        "image_url": {"url": f'data:image/jpg;base64,{x}', "detail": "low"}}, base64Frames)
        ],
    }
    ],
    temperature=0,
)
print(response.choices[0].message.content)
해당 코드를 위 링크를 참고 부탁드려요
OpenAI가 GPT-4o를 출시는 크게 3가지를 시사한다고 보아요
여러분, OpenAI가 GPT-4o 모델을 출시하면서 보여준 큰 변화에 대해 이야기해보고 싶어요.
첫 번째로, OpenAI는 그동안 특화된 기능을 가진 모델들을 개발해왔어요. 언어를 이해하는 ChatGPT, 음성을 인식하는 Whisper, 그리고 영상을 생성하는 Sora 등이죠. 이제 OpenAI는 이런 다양한 기능을 한데 모으는 단계에 접어든 것 같아요. 즉, 여러 기능을 하나로 통합하는 End-to-End 방식이 중요하다는 걸 시사하고 있습니다.
두 번째로, 일상에서 더 유용하고 친근한 AI 모델을 만들기 위해 일반인들의 데이터가 더 필요하다는 결정을 내린 것 같아요. OpenAI는 인터넷에서 다양한 데이터를 수집하여 놀라운 모델을 만들었지만, 일상생활에서 자연스럽게 활용할 수 있도록 하는 데는 한계가 있었던 것 같습니다. 연구자나 기술 애호가들에게는 매우 인상적일 수 있지만, 일반인들이 실제로 필요로 하는 것과는 다를 수 있기 때문이죠.
마지막으로, 이렇게 발전된 AI 기술은 결국 가정용 로봇에도 적용될 것이라고 생각해요. 각 가정에 로봇이 하나씩 있게 되고, 우리의 생활을 더욱 편리하게 만들어줄 것입니다. 마치 자동차가 일상의 필수품이 된 것처럼 말이에요.
이런 관점에서 OpenAI의 새로운 방향성은 AI 기술이 우리 일상에 더 깊숙이, 더 유용하게 다가갈 수 있는 미래를 제시하고 있어요. 이제 우리는 더 스마트한 일상을 기대해도 좋을 것 같습니다. 여러분은 이러한 변화를 어떻게 생각하시나요? AI가 우리의 일상에 더 가까이 다가오는 것, 환영하시나요?
여러분의 생각이 궁금해요 함께 나눠주세요
